Title here
Summary here
TLDR - What this guide covers
Effects are visuals or imagery created by taking advantage of the game’s features. They can make use of triggers, particles, layering or visual tricks, and the kinds of visuals you can create are limitless. There are many types of effects, as well as core mechanics that you should understand before trying to create your own. This section will go over the technical details you will need to know.
There are a lot of interesting applications when using colors. However, you need to understand how color channels work first. Color channels have three main properties you can use to your advantage; Copy Color, Opacity, and Blending.
Copy Color allows the color channel to copy the color of another channel, meaning if you change one color channel, you can change the color of other channels as well. Using the HSV sliders, you can create a new color based off of an old color channel. Your colors are now linked; you can do whatever you want with one color and it will display in your other colors.
Opacity allows you to see through objects. You can use this in many different ways: tinting your whole level using a low-opacity overlay, texturing your blocks with low-opacity blocks, or stacking low opacity blocks on top of each other to create a new shape. A specific effect that uses opacity is color banding. It can be made by stacking low-opacity objects that have a smooth gradient or glow on top of each other; changing their hues and opacity throughout the level gives an interesting effect.
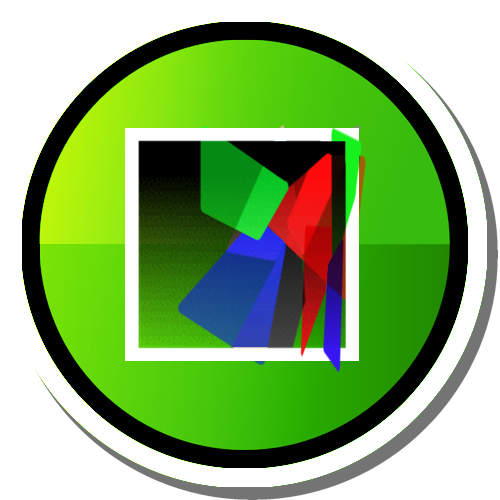
Blending is probably the most versatile option in the color channels. To quickly summarize blending, it takes the color values of a color and adds it onto the colors behind it. This is another way you can create new colors. For instance, overlapping a red object and a blue object will create purple within the region where they overlap. Blending objects appear to become more transparent as they become darker, meaning you have most of the applications of opacity as well. You could use this to pulse objects without giving them a separate group that is invisible. Blending objects look like they disappear on top of white objects as well, because white has maximum color values and therefore adding color onto white just looks white.
Since we are on the topic of blending, let’s discuss the Gradient Trigger blending modes as well. The additive mode works exactly like the blending discussed above, but multiply mode is where it gets interesting. Multiply works in the opposite way of additive blending; white is invisible, black is fully opaque. They are most visible on white backgrounds ,and are completely invisible on black backgrounds. Invert mode is slightly more complicated; it takes the backing color, subtracts it from the color of the gradient trigger, and then takes the absolute value. This means that if the gradient is white, the backing color will completely invert, and if the gradient is black, nothing will happen at all.
Now that we are done with colors, let’s move on to layering effects. Layering effects are slightly harder to wrap your head around as they work like illusions, subtly tricking your perception. The most basic concept of layering you will need to know is sandwiching, where you layer one object in between two other objects. In the following example, the blue square is in front of the red square, but it is behind the green square.
Front view
Top view
This is an extremely simple concept that may seem obvious, but it is the basis for pretty much all layering effects. One thing you can do with this, is to make the higher-layered object the same color as the background. This makes the object blend in with the background, creating a new shape.
What it looks like
What is actually happening
As you can see, we are making the illusion of an L, when it is in fact two squares. This general concept is known as negative space. The definition of negative space is the use of empty areas to define shapes or forms. Rather than creating forms by adding objects, you create forms by using the lack of objects.
Think about it; are these white striped rectangles on a black background? Or is the black background the part that is filled in, and the white striped texture is simply peeking through the holes as negative space?
||It was just a black structure on a white striped background. Congratulations if you were able to see through the illusion beforehand!||
None
Most GD levels apply this concept by filling in their “background” with a color and leaving the structures open, then putting a moving effect underneath the “background” to create a trippy effect. Sandwiching also applies to Gradient triggers in 2.2. Here is a part I made where the whole level is under an invert gradient. Because inverting an inverted object returns it to normal, by sandwiching the orbs between two other invert gradients, it won’t be inverted yet everything below it will.
This subsection will go over various specific effects that don’t have enough information to warrant their own subsection.
Shader triggers are a new addition to 2.2 that have lots of applications effect-wise. The Shader trigger specifically allows you to lock other shaders to specific layers, letting you have full control over that layer without conflicting with your other deco. Most of the “transformation” shaders like Shockwave, Bulge, and Pinch can help create lots of new and unique shapes. The various color shaders like Hue, Sepia, Grayscale and Invert allow you to have wonky colors as well.
What makes the shader triggers even more compelling though is their Strength, Intensity, or Target values. Typing in a number that goes over the slider limit creates unique shapes and colors that have a near endless amount of possibilities. Levels like Out of This World by Perox8, Metamorphosis by Blogde, Wulzy’s pixelate level, and a recent part in my solo, take advantage of these mechanics to create wonky structures. Unfortunately, one limitation that they have is that individual shaders can’t go on different layers, so all of your shader effects will go on the same layer. You can’t really have more than one unique shader effect going on unless you combine them.
Keep in mind that there is a big drawback behind shader effects; they are extremely laggy. By default they render at 4K resolution regardless of your screen size, unless you install the “Shader Fix” mod in Geode.
Area triggers are another gold mine of possibilities because of how versatile they are. They all allow you to make objects move in unique ways without any manual work. Almost all the Area triggers have a +- box, letting you input randomization within the movement. Once you think about all the things you could do with this, you will have ideas for weeks. For example, my collab part here uses Area Scale to seemingly make the structures melt into place, and also uses Area Tint to bring a splash of color to the edges of the screen.
Here is another part I made, where the vertices of the Gradient triggers moved around randomly to create a floating vibe.
Animated objects when scaled up, feature unique shapes and movements that can be used to your advantage. You could have bright periodic flashes by slowing them down and putting them on a bright, low-opacity color, or have them animate really fast on really low opacity on top of everything to convey texture. Here are two parts that use animated objects to their advantage.
The second example also acts as an example of Area triggers, as the structure’s outlines randomly move into place.
The Particle Editor is in my opinion, easily the second-best addition to the game effect-wise. You can make backgrounds, structures, overlays, air decoration, and even combine them using other effects. The number of things you could do with these should be self-explanatory, and as long as you know the basics, you can always make them work. Rather than talking about every possible thing you can do, I will list some parts that take advantage of the Particle Editor.
In particular, the option to randomize movement and color is probably one of the greatest features of the Particle Editor, as it offers endless possibilities for customizing your effects.
Another important concept that can be used effectively is Ambiguous Motion, which refers to visual motion that can be interpreted in multiple ways, due to unclear movements or cues. For example, the spinning dancer and the barber pole illusions below use ambiguous motion.
Neither of these illusions give you any clues on the actual movement that is going on, allowing your brain to infer what is happening. The barber pole illusion can be interpreted as either going to the right or going down, and you can take advantage of this by moving something right to make it look like it is going down.
HOW by Spu7nix explores this idea on the cylinders in the background. It uses various different patterns that go up and down to create the illusion of the cylinder rotating.
There is a category of effects called manual effects, which as the name suggests, are made manually. These effects (like lens flare, glow lasers, and impact frames) are used mainly to enhance artworks and don’t involve a core GD mechanic. This guide won’t go over these in detail as there is a lot of nuance behind them.
To end this section off, we have an honorable mention for the Advanced Follow trigger. I won’t go into detail on why this trigger is amazing for effects because of how advanced it is, but if you are confident with the trigger, go ahead and mess around with it to see what you can get. Below is one of the examples from earlier; this time, I want to bring your attention to the background which was made using Gradient triggers and Advanced follow triggers. The concept of this background is complex, being based off of the butterfly effect and the three-body problem, but it helps demonstrate how versatile Advanced Follow can be.
As you can see from the previous section, the possibilities are endless; this makes the process of implementing the effect way more important than it may seem. When actually creating your effects, the first thing to do is to have an idea in mind. This idea can be nearly anything; similar to a block design or background idea. Having an idea may look obvious, but when making effects, a clear idea will help you a lot. The difference between effect ideas and other ideas is that you have to know about the logistics behind the idea; you need to be able to visualize how your effect works and what resources go into creating it.
Most effect ideas start off as pure concepts. These are features of the editor that aren’t fleshed out enough to be used in an actual level. Unless you already have a hyper specific idea already, you should start with a concept, as they are easier to explore and provide greater flexibility for integration into your level. Once you have a concept, you need to think about the limits to the GD Editor and think about everything you can do to exploit said concept into a tangible idea.
Let’s make an example. You could start with this editor fact: blending objects are invisible on top of a white background. This concept gives lots of options to expand on. For instance, you could pulse the background to a different color to peek through the blending overlay, or you could use low-opacity particle objects to give everything a texture that won’t show up in the background. You can consider every possibility and pick the one that fits your level the best. Below are two examples that use the same concept but expand in different directions, creating a different effect.
Example 1 Example 2 (1 minute in)
Here is another example of building on a concept. Using long rotating rectangles with the same color allows for interesting patterns to come up beneath them. My friend first used this technique in the first video below, and I later drew inspiration from it for the background in the next video. Keep in mind that I took the idea and expanded on it, rather than outright stealing it.
Example 2 (Start)
Now that you know what your effect does and how it works, you should start brainstorming how to apply it to your level. This is where the trigger stuff comes in and where things may start breaking; this process will vary depending on the effect. Here are some tips below anyway:
Trust the process. Your effect won’t always look good at the start and it will feel weird; just keep working on it until it works. Having a block design in the middle of a layout won’t fit until you start decorating the entire level after all.
Keep track and organize. Your effect may get messy depending on its type. Make sure you keep track of where everything is in order to not get confused. Messing up isn’t the end of the world but it will definitely cost you some time.
Stay patient. If your effect breaks either during the process or later on, just stay patient. It is not the end of the world if you slowly figure out the cause of the problem, and if the problem ends up being something unfixable, just move onto the next effect. It probably won’t always work the first time. In case you want more tips on fixing your problem, head to the Solving Problems guide.
 ,
Silvow and
sparktwee.
,
Silvow and
sparktwee.